前言
随着移动互联网的日益发展,越来越多的人开始使用手机或平板电脑访问网站。这使得网站的响应式设计变得非常重要,因为它可以使网站在不同设备上实现自适应显示,提高用户体验。
除此之外,许多网站也需要添加一些免责声明或隐私条款,以保护自己和用户的权益。这在一些特定的行业中尤为重要,例如金融、医疗和法律等领域。
本篇文章将探讨如何使用响应式设计来实现网站在不同设备上的自适应显示,以及如何添加免责声明弹窗以满足特定行业的规定。
希望通过本文的介绍,您能够更好地应对网站设计和开发中所遇到的问题,并为您今后的互联网之路提供一些参考。
本站免责声明代码分享
第一步
首先把一下代码放在joe主题的index.php文件的 <body> 标签中,文件路径: /usr/themes/Joe
 <!--弹窗代码位置-->
    <div class="popup-overlay">
    <div class="popup-box">
        <h2>免责声明</h2>
        <p>您正在访问本站,请您仔细阅读以下条款并确认:</p>
        <ul>
            <li>本站所有文章仅代表作者个人观点,不代表本站立场。</li>
            <li>本站不保证所提供的信息的准确性、完整性、有效性或实时性。</li>
            <li>本站将不会为任何为基于这些信息或其拖累而引发的任何损失或损害承担责任。</li>
        </ul>
        <div class="popup-buttons">
            <button class="agree-button">果断同意</button>
            <button class="disagree-button">查看详细</button>
        </div>
    </div>
</div>
        <!--弹窗代码位置-->
第二步
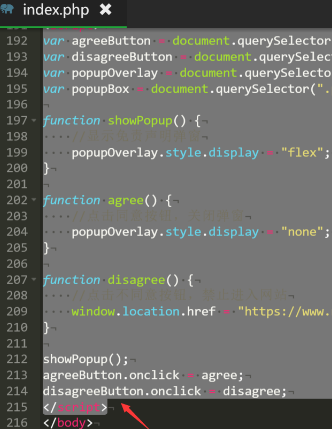
把下面的javascript代码放在joe主题的index.php文件的 </body> 标签之前,文件路径: /usr/themes/Joe
<!--js弹窗检测-->
<script>
var agreeButton = document.querySelector(".agree-button");
var disagreeButton = document.querySelector(".disagree-button");
var popupOverlay = document.querySelector(".popup-overlay");
var popupBox = document.querySelector(".popup-box");

function showPopup() {
    //显示免责声明弹窗
    popupOverlay.style.display = "flex";
}

function agree() {
    //点击同意按钮,关闭弹窗
    popupOverlay.style.display = "none";
}

function disagree() {
    //点击不同意按钮,禁止进入网站
    window.location.href = "https://www.网站免责声明.html";
}

showPopup();
agreeButton.onclick = agree;
disagreeButton.onclick = disagree;
</script>
代码位置演示js:

第三步
将下面的css代码复制,然后去这个目录: /usr/themes/Joe/assets/css 下创建一个叫 popup.css 的文件,创建完成后把复制的css代码粘贴进去即可完成。
.popup-overlay {
    display: none;
    position: fixed;
    top: 0px;
    left: 0px;
    height: 100%;
    width: 100%;
    background: rgba(0, 0, 0, 0.4);
    justify-content: center;
    align-items: center;
     z-index: 999; /* 将 z-index 设置为较低的值 */
}

.popup-box {
    display:flex;
    flex-direction: column;
    position: relative;
    background: #fff;
    width: 30%;
    height: auto;
    padding: 20px;
    border-radius: 4px;
}

.popup-box h2 {
    font-size: 28px;
    margin-top: 0px;
    text-align: center;
}

.popup-box p {
    font-size: 16px;
    line-height: 24px;
    margin: 10px 0px;
    text-align: center;
}

.popup-box ul {
    list-style-type: square;
    margin: 10px 30px;
    padding: 0;
}

.popup-box li {
    margin: 10px 0px;
    font-size: 14px;
    line-height: 20px;
    text-align: center;
}

.popup-buttons {
    display: flex;
    justify-content: center;
    align-items: center;
    margin-top: 20px;
    gap: 20px;
}

.agree-button {
    display: inline-block;
    padding: 10px 20px;
    background-color: #00cc00;
    color: #fff;
    border-radius: 4px;
    font-size: 18px;
    cursor: pointer;
}

.disagree-button {
    display: inline-block;
    padding: 10px 20px;
    background-color: #007bff;
    color: #fff;
    border-radius: 4px;
    font-size: 18px;
    cursor: pointer;
}
第四步
在网站的全局设置中 head 引入css文件即可。引入的代码如下:
<!-- 弹窗代码引入开始 -->
<link rel="stylesheet" href="/usr/themes/Joe/assets/css/popup.css">
<!-- 弹窗代码引入结束 -->


评论 (3)